

Today I’m going to show you how you can pull off a perfect trade show booth in 30 days or less without the stress of last-minute changes, vendor disconnects, or costly execution errors.
With this checklist, you will learn how to: –
- Maintain all booth milestones on schedule from planning to installation
- Avoids last minute design changes and production hold-ups
- Bring designers, fabricators, logistics partners and venue teams together with confidence
- Costly mistakes can delay the installation of your booth and affect your event.
- Arrive at the venue with a pre-assembled, ready-to-show booth
So, what’s the secret behind exhibitors who always deliver a successful trade show booth rental experience without the usual stress and chaos?
It’s a proven execution framework called the BoothReady Blueprint™.
In this guide, I’ll walk you through the BoothReady Blueprint™ step-by-step. I’ll show you exactly how to plan, coordinate vendors, manage timelines, and tick off every important task before event day. Then your booth will be ready before the exhibition doors open.
The BoothReady Blueprint™
The BoothReady Blueprint™ is a five-phase execution system. It helps exhibitors deliver a flawless trade show booth by eliminating last-minute changes. This also closes vendor coordination gaps and keeps every task on schedule before event day.
Instead of a traditional checklist, it brings all critical activities (booth design approvals, production timelines, logistics, installation, and final pre-show inspections) under one streamlined process. This way you always know what needs to be done, who owns it, and when it’s due.
The framework is divided into five execution phases: –
Phase 1: PLAN: Define project timelines, assign responsibilities, confirm booth requirements, and establish communication with every vendor.
Phase 2: – PREPARE: Finalize booth designs, approve graphics, order utilities, arrange shipping, and secure all venue approvals.
Phase 3: – COORDINATE: Keep designers, fabricators, logistics partners, installers, and event organizers aligned through scheduled checkpoints and progress reviews.
Phase 4: – VERIFY: Review production quality, confirm shipping schedules, inspect booth components, and complete a final readiness audit before departure.
Phase 5: – EXECUTE: Manage installation, supervise booth setup, resolve on-site issues quickly, and ensure your exhibit is show-ready before attendees arrive.
The BoothReady Blueprint™ gives you a proven system so you can stay organized. It helps you to coordinate with vendors efficiently and deliver a flawless trade show booth.
Step 1: PLAN: Build Your 30-Day Trade Show Timeline
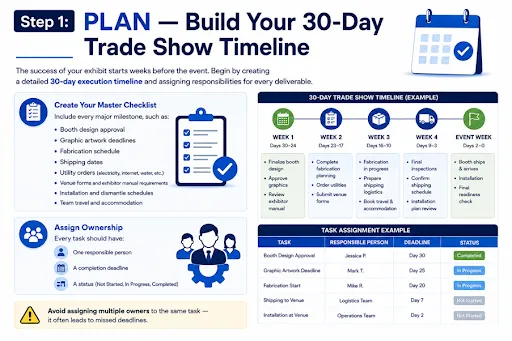
The success of your exhibit starts weeks before the event. Begin by creating a detailed 30-day execution timeline and assigning responsibilities for every deliverable.
Create Your Master Checklist
Include every major milestone, such as: –
- Booth design approval
- Graphic artwork deadlines
- Fabrication schedule
- Shipping dates
- Utility orders (electricity, internet, water, etc.)
- Venue forms and exhibitor manual requirements
- Installation and dismantle schedules
- Team travel and accommodation
Assign Ownership
Every task should have: –
- One responsible person
- A completion deadline
- A status (Not Started, In Progress, Completed)
- Avoid assigning multiple owners to the same task. It often leads to missed deadlines.
Solution: Build your master checklist in a single shared spreadsheet or project tool from day one, not in scattered email threads. If a task doesn’t have one name and one date attached to it in that sheet, it doesn’t count as planned yet.
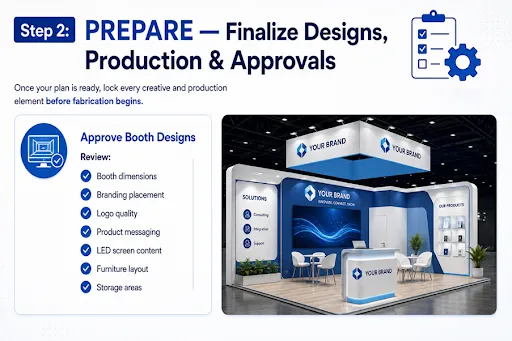
Step 2: PREPARE: Finalize Designs, Production & Approvals
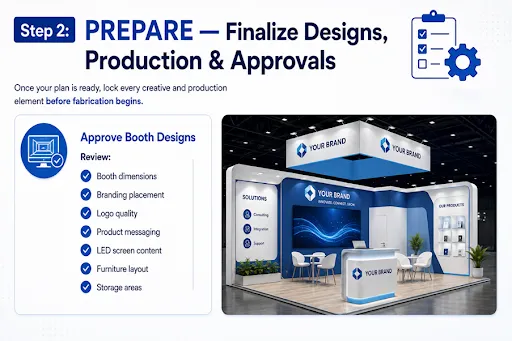
Once your plan is ready, lock every creative and production element before fabrication begins.
Approve Booth Designs
Review: –
- Booth dimensions
- Branding placement
- Logo quality
- Product messaging
- LED screen content
- Furniture layout
- Storage areas
Verify Production Files
Before sending artwork to production: –
- Confirm print dimensions
- Convert fonts to outlines if required
- Check image resolution
- Review color consistency
- Approve the final production proof
Complete Venue Documentation
Submit all required documents before the organizer’s deadline, including: –
- Booth drawings
- Hanging sign approvals (if applicable)
- Insurance certificates
- Utility order forms
- Health and safety documents
- Contractor access forms
Late submissions often result in additional fees or installation delays.
Solution: Treat the organizer’s documentation deadline as your real deadline, not the show date. Submit every form at least 3-5 days early so there’s still time to fix a rejected form before it becomes a late fee or an installation delay.
Step 3: COORDINATE: Keep Every Vendor in Sync
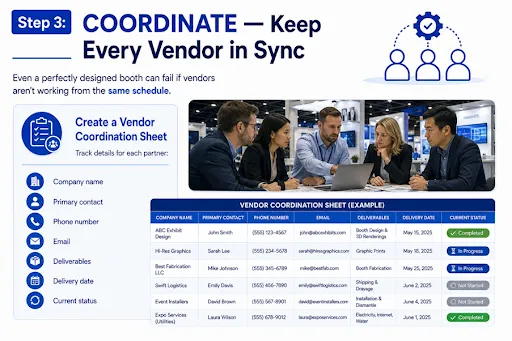
Even a perfectly designed booth can fail if vendors aren’t working from the same schedule.
Create a Vendor Coordination Sheet
Track details for each partner: –
- Company name
- Primary contact
- Phone number
- Deliverables
- Delivery date
- Current status
Schedule Weekly Progress Reviews
Meet with all stakeholders to confirm: –
- Production progress
- Shipping readiness
- Installation schedules
- Outstanding approvals
- Potential risks
Address small issues early before they become last-minute problems.
Solution: Conduct each weekly review from the same coordination sheet, live, on-screen, not from memory or separate notes. This means gaps show up right away instead of on install day, because everyone sees the same status column at the same time.
Step 4: VERIFY: Complete a Final Readiness Audit
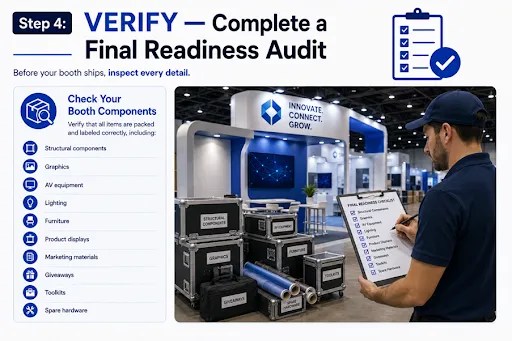
Before your booth ships, inspect every detail.
Check Your Booth Components
Verify that all items are packed and labeled correctly, including: –
- Structural components
- Graphics
- AV equipment
- Lighting
- Furniture
- Product displays
- Marketing materials
- Giveaways
- Toolkits
- Spare hardware
Confirm Logistics
Double-check: –
- Pickup date
- Delivery address
- Warehouse deadlines
- Tracking information
- Installation crew schedule
A final audit significantly reduces the chance of surprises on-site.
Solution: Do this audit against a printed or shared checklist, item by item, at least 5-7 days before pickup. That buffer is what allows you to source a replacement if something is missing or damaged.
Step 5: EXECUTE: Deliver a Show-Ready Booth
The final phase is all about execution. Arrive before installation begins and oversee the setup process.
Inspect the Booth
Before the exhibition opens: –
- Confirm structural stability
- Test lighting and electrical connections
- Verify digital displays
- Check branding and graphics
- Ensure products are displayed correctly
- Walk through the booth from a visitor’s perspective
- Resolve any remaining issues before attendees arriveOnce everything has been verified, your booth is ready to welcome visitors with confidence.
Solution: Have the visitor-perspective walkthrough last, once every technical check is done. Stand in the aisle and walk up to your own booth as a stranger would. It’s the fastest way to catch the one obvious issue that every close-up inspection misses.
The Complete Trade Show Exhibitor Checklist: All 78 Tasks, Phase by Phase
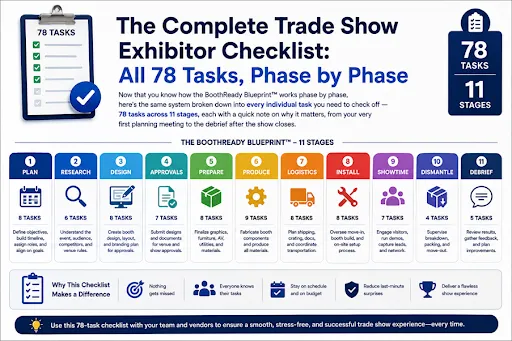
Now that you know how the BoothReady Blueprint™ works step-by-step, here’s that same system broken down into every single task you need to check off – 78 tasks in 11 stages. Each task has a quick note on why it matters (from your very first planning meeting to the debrief after the show closes).
Phase 1: – Strategy & Planning
1. Define Trade Show Goals & KPIs: First, establish specific, measurable targets like leads, meetings, and pipeline so every later decision has something to be judged against.
2. Set Your Trade Show Budget: Before making any commitments, decide how much you want to spend on booth space, design, staff, marketing, and a contingency fund.
3. Choose the Right Booth Size & Location: Think about traffic flow (corners and spots near entrances), rather than just square footage.
4. Build a 30-Day Project Timeline: Put every milestone from design approval to installation onto real dates.
5. Assign Roles & Responsibilities: Assign an owner and deadline to each task. Shared ownership is the reason deadlines are missed.
6. Create a Master Trade Show Checklist: Put every task from every phase into a single shared document everyone can see and update.
Phase 2: – Booth Design & Production
7. Finalize Booth Design: Lock dimensions, branding placement, and furniture layout together as one approved package, not piece by piece.
8. Approve Graphics & Branding: Review logo quality, product messaging, and LED content before anything goes to print.
9. Review Artwork Before Printing: Confirm print dimensions, convert fonts to outlines, and check resolution to avoid a reprint.
10. Confirm Booth Dimensions: Double-check your booth measurements against the venue’s actual space allocation, not just your design file.
11. Inspect Fabrication Progress: Check in with your builder mid-production instead of waiting until the piece is finished to spot problems.
12. Perform Quality Control Checks: Physically inspect every component for damage or defects before it ships, not after it arrives on-site.
13. Pack Booth Components: Pack and label every piece clearly so installation crews can find what they need without guesswork.
Phase 3: Vendor Coordination
14. Create a Vendor Contact List: Track every vendor’s contact, deliverable, and deadline in one shared sheet.
15. Coordinate Booth Builder: Confirm production timeline and installation responsibilities directly with your builder, in writing.
16. Confirm AV & Technology Vendors: Verify screen sizes, content formats, and setup times with your AV provider ahead of time.
17. Book Freight & Logistics: Book your shipping and freight slots in advance. Last-minute booking usually means a higher cost and less flexibility.
18. Coordinate Installation & Dismantling (I&D): Confirm your I&D labor schedule and union requirements (if any) well in advance of show week.
19. Schedule Vendor Checkpoints: Schedule regular check-ins with each vendor so small delays are caught early rather than on installation day.
20. Track Deliverables & Deadlines: Don’t wait until something feels “off” to check vendor status against your master checklist. Check it weekly.
Phase 4: – Event Organizer & Venue Requirements
21. Review the Exhibitor Manual: Read the Exhibitor Manual thoroughly at least once. It contains every deadline and rules the organizer will actually enforce.
22. Submit Booth Design Approvals: Send your design to the organizers for approval well in advance of their due date, especially for double deck or custom builds.
23. Complete Utility Orders: Get electricity, water, and other utilities early. On-site rates are nearly always higher.
24. Arrange Internet & Wi-Fi: Purchase dedicated internet if your booth involves live demos or digital payments.
25. Order Electrical Services: Be sure to tell the venue what you need (outlets, amperage) so they’ll install the right configuration from the start.
26. Book Material Handling: Book material handling and reserve drayage in advance to avoid rush fees during move-in.
27. Submit Insurance Certificates: Submit your certificate of insurance by the deadline set by the organizer. The reason is that late submissions can block installation.
28. Complete Health & Safety Forms: Submit any health & safety paperwork required, especially for booths that have structures, rigging, or food service.
29. Secure Hanging Sign Approval (if applicable): Get your hanging sign design & rigging plan approved early. This usually has a separate deadline.
Phase 5: Marketing Preparation
30. Create Your Trade Show Landing Page: Build an exclusive mobile-friendly page with your booth number and a strong call to action to book a meeting.
31. Send Pre-Show Email Campaigns: Have a 5-email sequence that starts 60 days in advance so you build momentum instead of having it spike just once.
32. Schedule Social Media Promotion: Queue countdown content at T-60, T-30, T-14, T-7, and T-1 so posting doesn’t get forgotten in the rush.
33. Invite Existing Customers: Personally invite existing customers to stop in. These are some of your easiest and warmest booth conversations.
34. Book Meetings Before the Show: Try to get 30-40% of your meetings booked before the doors open. It’s the single best predictor of a strong show.
35. Prepare QR Codes: Link every QR code to a specific form, demo, or booking page. Avoid your generic homepage.
36. Print Marketing Materials: Order brochures and one-pagers early enough to catch and fix any printing errors before the show.
37. Order Promotional Giveaways: Choose giveaways that tie back to your product or require an action to earn, not just free swag.
Phase 6: Team Preparation
38. Train Booth Staff: Practice greeting visitors and asking open-ended questions instead of waiting behind the counter.
39. Prepare Elevator Pitch: Give every staff member the same 15-second answer to “what do you do?” so the story stays consistent.
40. Practice Product Demonstrations: Run through the live demo as a team at least once before show day so it’s smooth under pressure.
41. Define Lead Qualification Questions: Agree on the same handful of qualifying questions (problem, authority, cost, timeline) for every staff member to ask.
42. Assign Daily Booth Shifts: Schedule shifts in advance so the booth is always staffed and no one works the entire show exhausted.
43. Prepare Staff Dress Code: Confirm branded attire or dress code ahead of time so the team looks consistent on the floor.
44. Create Emergency Contact List: Share a list of key vendor, venue, and team contacts everyone can reach if something goes wrong on-site.
Phase 7: – Shipping & Logistics
45. Confirm Shipping Dates: Schedule the dates of pickup and delivery with a buffer before the installation begins.
46. Label Every Booth Component: Clearly mark all crates and components so nothing is lost or misplaced in transit.
47. Track Freight: Track information in the days before the show so delays are caught early, not on arrival.
48. Prepare Tool Kit & Spare Parts: Pack basic tools, spare hardware, and backup cables. Small fixes shouldn’t derail installation.
49. Verify Warehouse Delivery: Don’t just assume your shipment is on schedule. Confirm that it actually arrived at the advance warehouse.
50. Confirm Installation Schedule: A few days before the show, confirm the time and scope of work for your installation crew.
Phase 8: – Pre-Show Final Inspection (7–3 Days Before)
51. Review Every Checklist Item: Go through all of the master checklist line by line. Memory is not to be trusted to know what actually is done.
52. Test Digital Screens & AV Equipment: Power up and test all screens and AV equipment prior to shipment before the installation.
53. Confirm Furniture & Accessories: Verify that all furniture and accessories are packed and correspond to your final booth layout.
54. Verify Product Samples: Confirm product samples or demo units are packed, functional, and match what you plan to showcase.
55. Check Printed Graphics: Inspect printed graphics for color accuracy and damage before they leave for the venue.
56. Confirm Staff Travel & Hotel Bookings: Double-check flights and hotel bookings for every team member attending.
57. Print Important Documents: Print exhibitor badges, insurance certificates, and any required forms your team may need on-site.
Phase 9: On-Site Setup
58. Supervise Booth Installation: Have a member of your team be on hand for the entire installation, not just a final walk-through.
59. Inspect Graphics & Lighting: Confirm graphics are correctly hung, and lighting is accentuating the booth as intended.
60. Test Internet & Power: Check that the power and internet are on and working before you need them for a demo.
61. Verify Product Displays: Verify that products are displayed exactly as planned. Don’t stay put just because your team says it is convenient or okay.
62. Check Storage Areas: Storage areas should be organized and have space to store giveaways, samples, and staff items.
63. Complete Final Booth Walkthrough: Walk the booth as a visitor would, from the aisle, to catch what a close-up check misses.
64. Resolve Last-Minute Issues: Fix anything you find during the walkthrough before the doors open, not during show hours.
Phase 10: During the Trade Show
65. Capture Every Lead: Document contact info and notes for each visitor interaction, not just the ones that seemed promising.
66. Qualify Booth Visitors: Repeat the same qualification questions for every conversation so your team will prioritize consistently.
67. Schedule Follow-Up Meetings: Don’t let a great lead walk away from your booth without booking the next step. Never end with “we’ll follow up.”
68. Record Visitor Feedback: Note any common questions or objections. They are great feedback for messaging and future shows.
69. Restock Marketing Materials: Make sure you check your brochures, giveaways, and supplies every morning so you don’t run out at the booth mid-day.
70. Monitor Booth Performance Daily: Track the number of visitors and the quality of leads each day so you can adjust staffing or messaging in real time.
Phase 11: Post-Show Checklist
71. Send Thank-You Emails: Send a personalized note within 24-48 hours that references the actual conversation.
72. Upload Leads to CRM: Get every lead and notes into CRM immediately, not days later from memory.
73. Prioritize Hot, Warm & Cold Leads: Segment leads by urgency so sales can follow up fastest with those most ready to buy.
74. Schedule Sales Follow-Ups: Pass each qualified lead to a rep with a follow-up date set. Don’t give generic answers like “Someone will contact you.”
75. Measure Trade Show ROI: Calculate (Revenue − Cost) ÷ Cost × 100 so you know the real return.
76. Conduct Internal Debrief: Gather your booth team while the show is still fresh in everyone’s minds to capture what worked and what didn’t.
77. Document Lessons Learned: Write down specific takeaways so next year’s team can act on them. Avoid generic takeaways like “It went well.”
78. Plan Improvements for the Next Event: Turn your debrief notes into concrete changes for the next show instead of starting from scratch again.
By following the BoothReady Blueprint™, you’ll replace last-minute chaos with a structured execution process. This process keeps every vendor aligned. It keeps every deadline under control and every booth ready before the show begins.
Conclusion
With the help of BoothReady Blueprint™, you can execute a perfect trade show booth in only 30 days. You don’t have to take the stress of last-minute modifications, missed deadlines, or vendor coordination gaps. No more spreadsheets, email chains, and last-minute problem-solving. You have a proven execution system that keeps every task, approval, vendor, and milestone organized from the day you start planning to the day your booth is completely installed on the show floor.
Great booths aren’t built by great exhibitors; they are built by great exhibitors who follow a repeatable process that guarantees every project is delivered on time, on budget, and without unnecessary stress. The BoothReady Blueprint™ provides that process.
Ready to Deliver Your Next Booth Without the Last-Minute Chaos?
Download or bookmark this checklist and use the BoothReady Blueprint™ before every trade show to keep your team aligned, your vendors coordinated, and your booth ready for a successful event.
If you found this checklist helpful, share it with your project team or fellow exhibitors so they can avoid the same last-minute challenges and deliver a flawless booth every time.